Installing Pi.Cass.So
Installation
Necessary configuration.
| Minimum requirements | Recommended requirements | |
| Operation system | Windows XP – Service pack 2 or better | Windows 10 |
| Procesador | Intel Pentium 4 – 2.8 GHz | Intel Core 2 Duo 2GHz or better |
| Memoria RAM | 1Gb | 2Gb DDR2 or better |
| Disco Duro | 80 Gb | 120 Gb or better |
| Tarjeta gráfica | Nvidia with 3D aceleration (128 Mb video memory) | Nvidia 9600 or better with 3D aceleration (512 Mb video memory) |
| Mousse | 3 buttons + wheel | 3 buttons + wheel |
| Conexión internet | ADSL | ADSL |
Installation process.
Go to the website www.ortoiberica.com
At the top of the page the “Descarga Pi.Cas.So” tab appears.

Click on it and enter the following submenu:
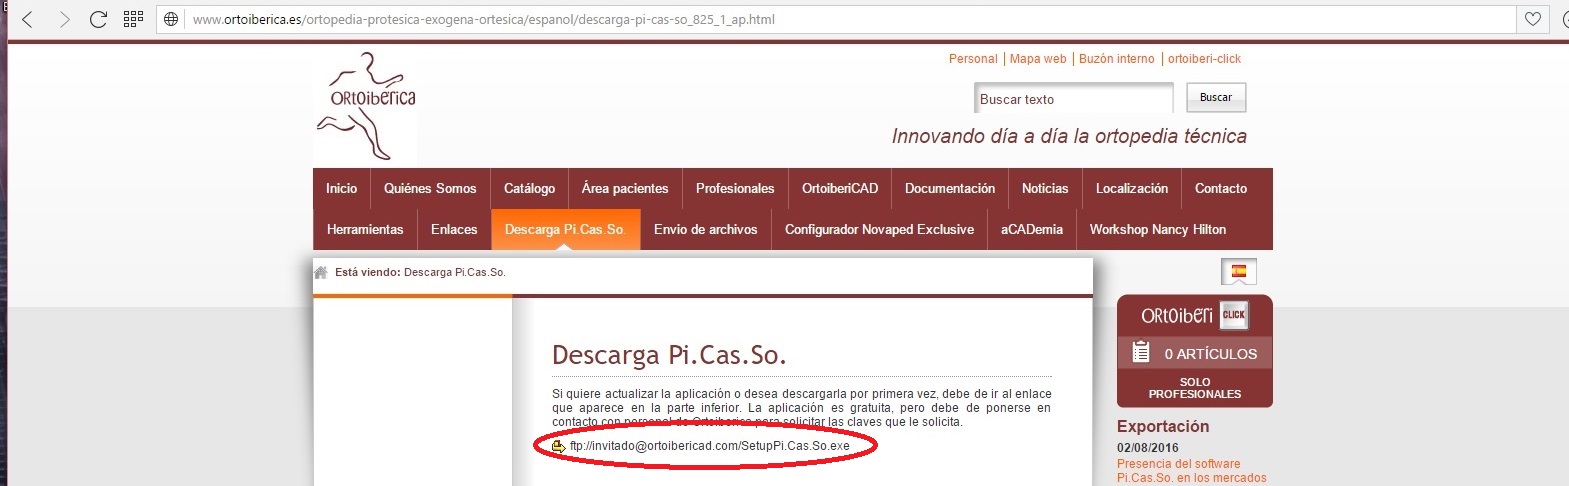
Click on the FTP link that appears.
Previously, you would have to request the access keys to Ortoibérica S.L. sending a form you can find at the following link:
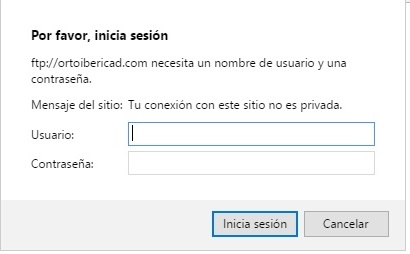
Enter the keys, both user and password, as they have been given, respecting the case and lowercase.
NOTE: There may be variations or special permissions depending on the browser and version you are using. We recommend Chrome, Opera or Firefox. With Explorer, you may have to perform special permissions.
Automatic updates.
Currently, the latest version of the software is v.2.68 (03.08.2017).
If using Pi.Cas.So the following window appears:
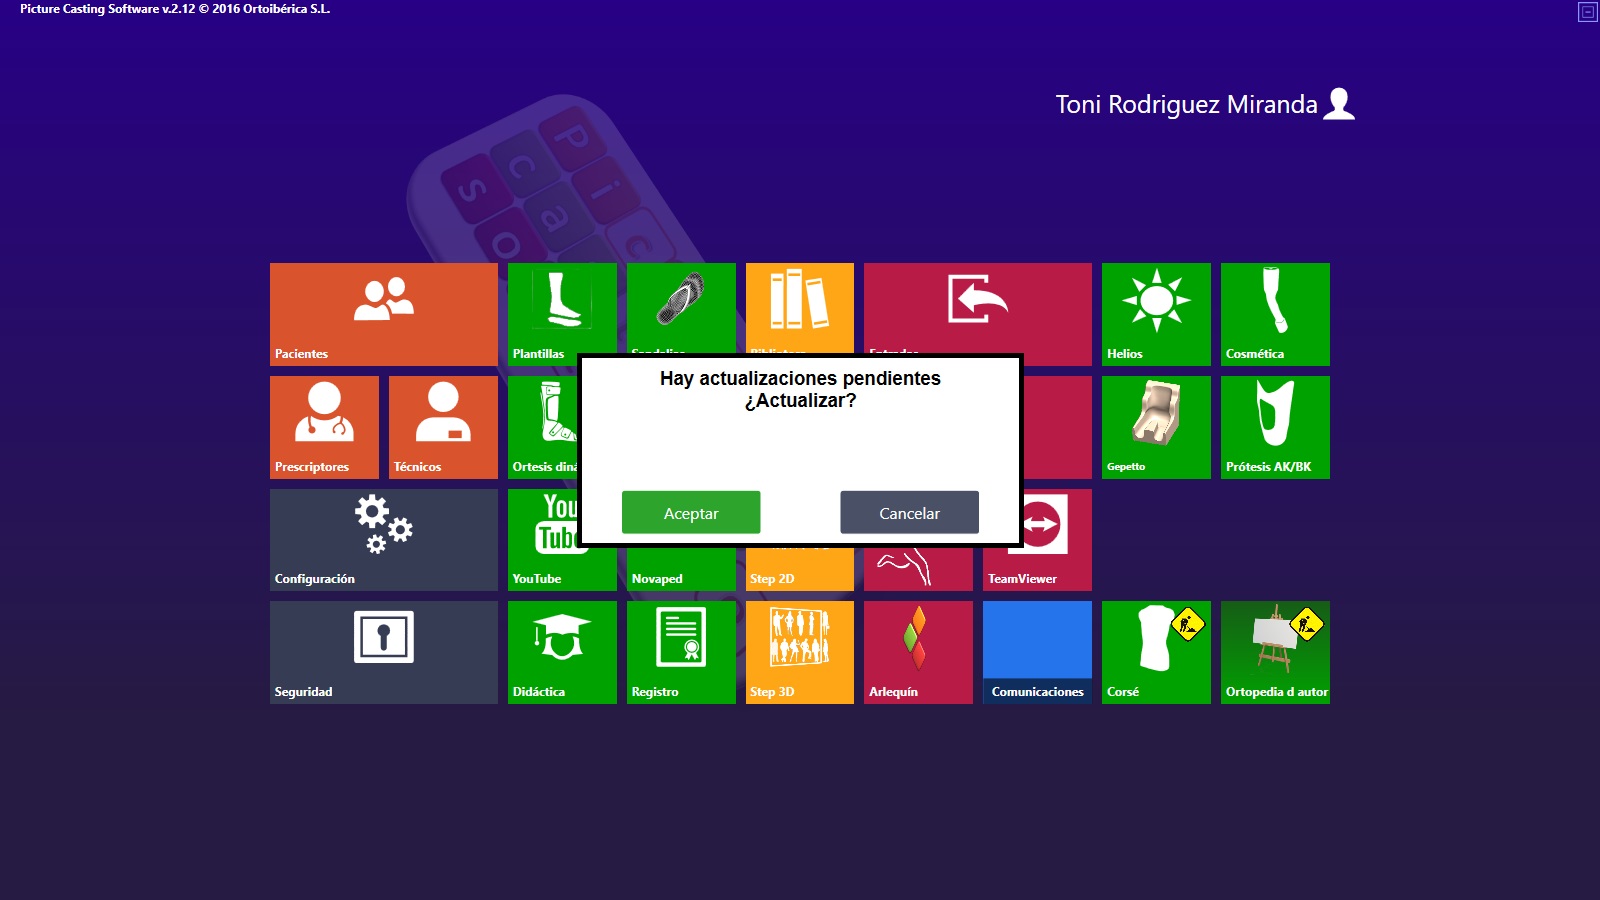
The program is informed that a new update is available.
If you want to continue with the version that has installed, click: ![]()
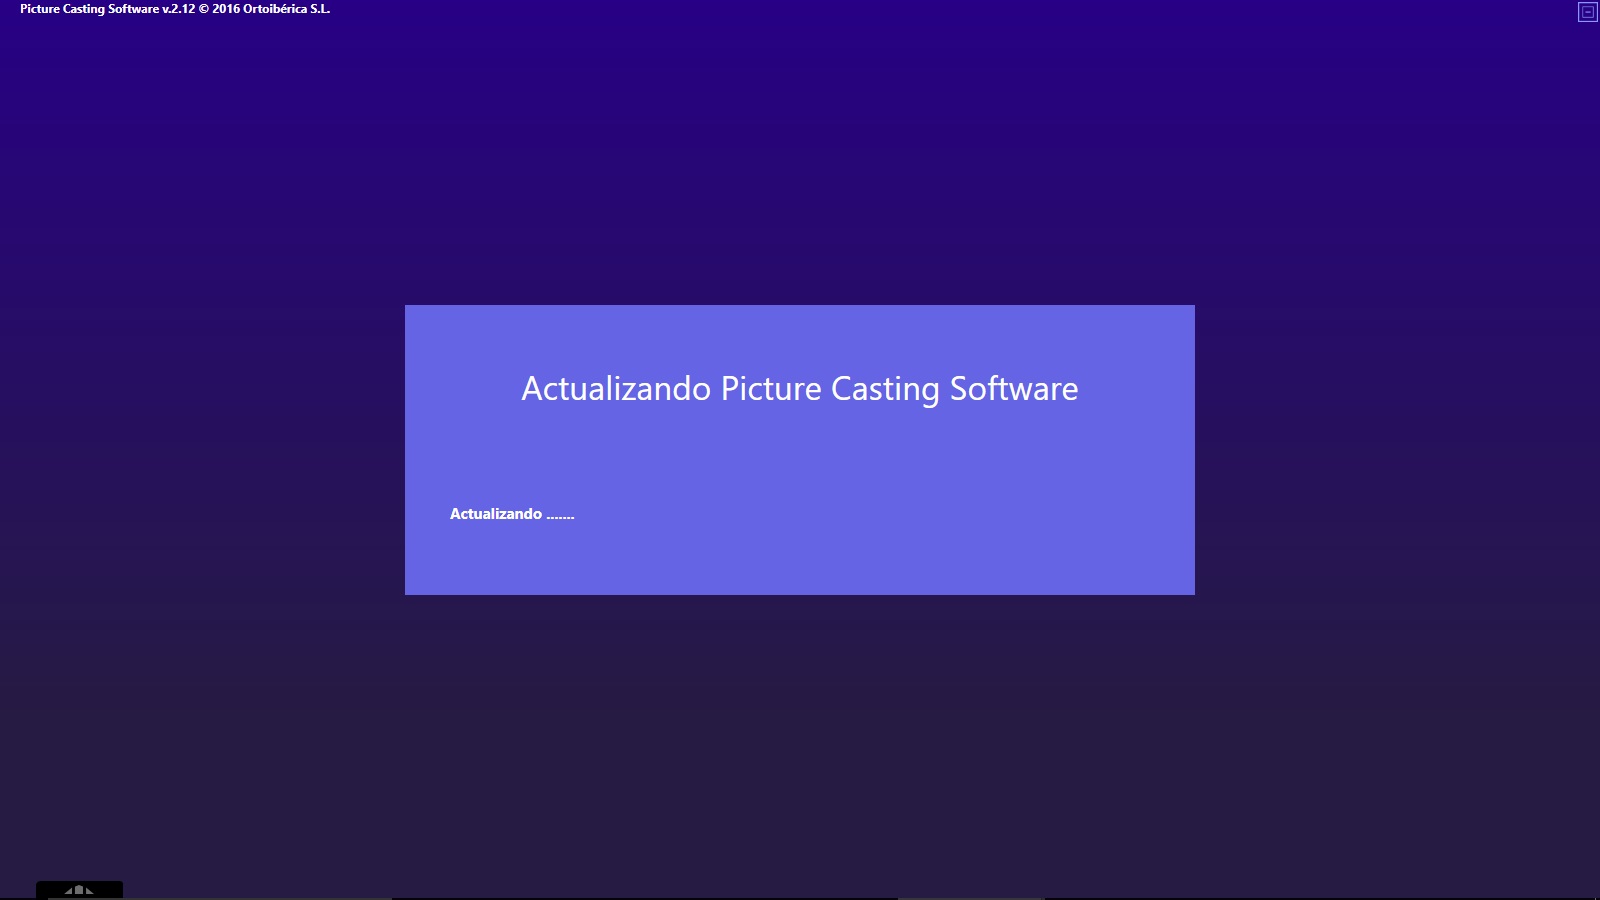
If on the other hand, you want the update to be executed, click: ![]()
Depending on the version of windows you have will appear information similar to the following:
Click: ![]()
Subsequently and as confirmation of the download will appear the following screen:
When the download is complete, the following window will appear:
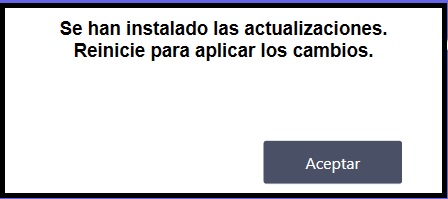
Click: ![]()
NOTE: It is not necessary to restart the computer, it is sufficient to restart the program Pi.Cas.So.
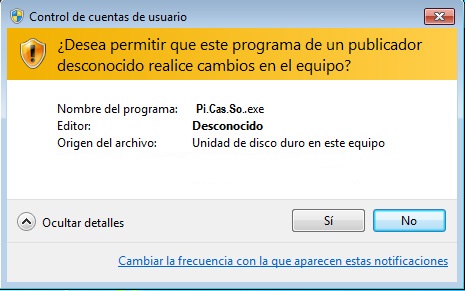
Depending on the version of Windows, as well as the antivirus installed on the computer, or any type of firewall. In some cases, it is necessary to execute the program Pi.Cas.So. as administrator. To do this, when you run the program should click on the icon Pi.Cas.So. with the right button and you will get the following dialogue box:

You must run as administrator.
Licences.
Pictures Casting Software has been developed with the intention of giving a powerful and useful tool to customers of Ortoibérica SL milling service and at the same time free of charge. All users who use the software for its design and later sent the resulting file to Ortoibérica will enjoy as many licenses as they consider totally free.
It is contemplated that some user may want to send it to another milling plant, or even that it can be milled or manufactured in a 3D printer of its own. In these cases, a license for it is use must be paid for one year, extendable.
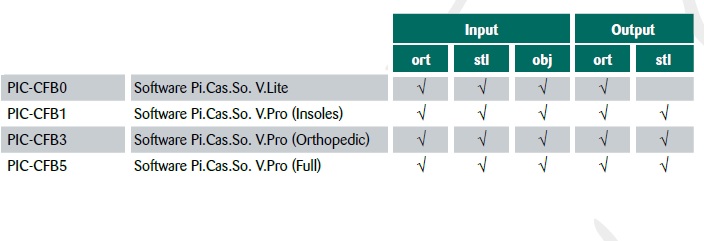
There are three types of license, with universal STL output, readable on practically all robots, carvers or milling machines.
To be operational the license is essential to be connected to the internet.
Licenses are renewed automatically every year. The licenses are linked to the computer with a user name and an IP.
In case you have reinstalled the Pictures Casting Software, or want to change location of the license must lead Ortoibérica SL, by mail to welcome@ortoiberica.es
Special licenses for CFB (milling plants) are also contemplated, it may address to Ortoibérica SL in order to properly explain their needs, and send you a personalised quote.
NOTE: the telephone attention of the Pi.Cas.So. software only take place in V.Pro licenses (all three versions). For inquiries about v.Lite will be made only by email.
Multiuser.
Multiple users can work on a single computer, providing each own patients. To do this, follow these steps:
Go to module Configuration
The following options appear in the configuration:
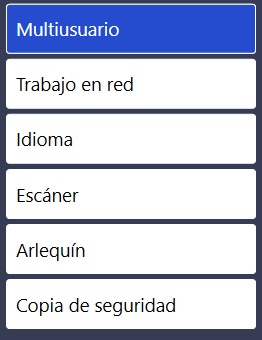
Mark Multiuser and activate the box.
![]()
and click on ![]()
Multiuser feature is already enabled, you must go to the Security Module (see tutorial Security Module)
NOTE: when the multiuser function is activated, you can only access the program with your access key, inserted into the security module.
Network Configuration
Pi.Cas.So. envisages a network installation for an organisation. Can be hosted on a server and shared by several connected computers, these computers can share the same folders.
This type of installation, not for his complexity, but by the responsibility of its realisation, we advise it to be carried out by qualified personnel with advanced knowledge in networks.
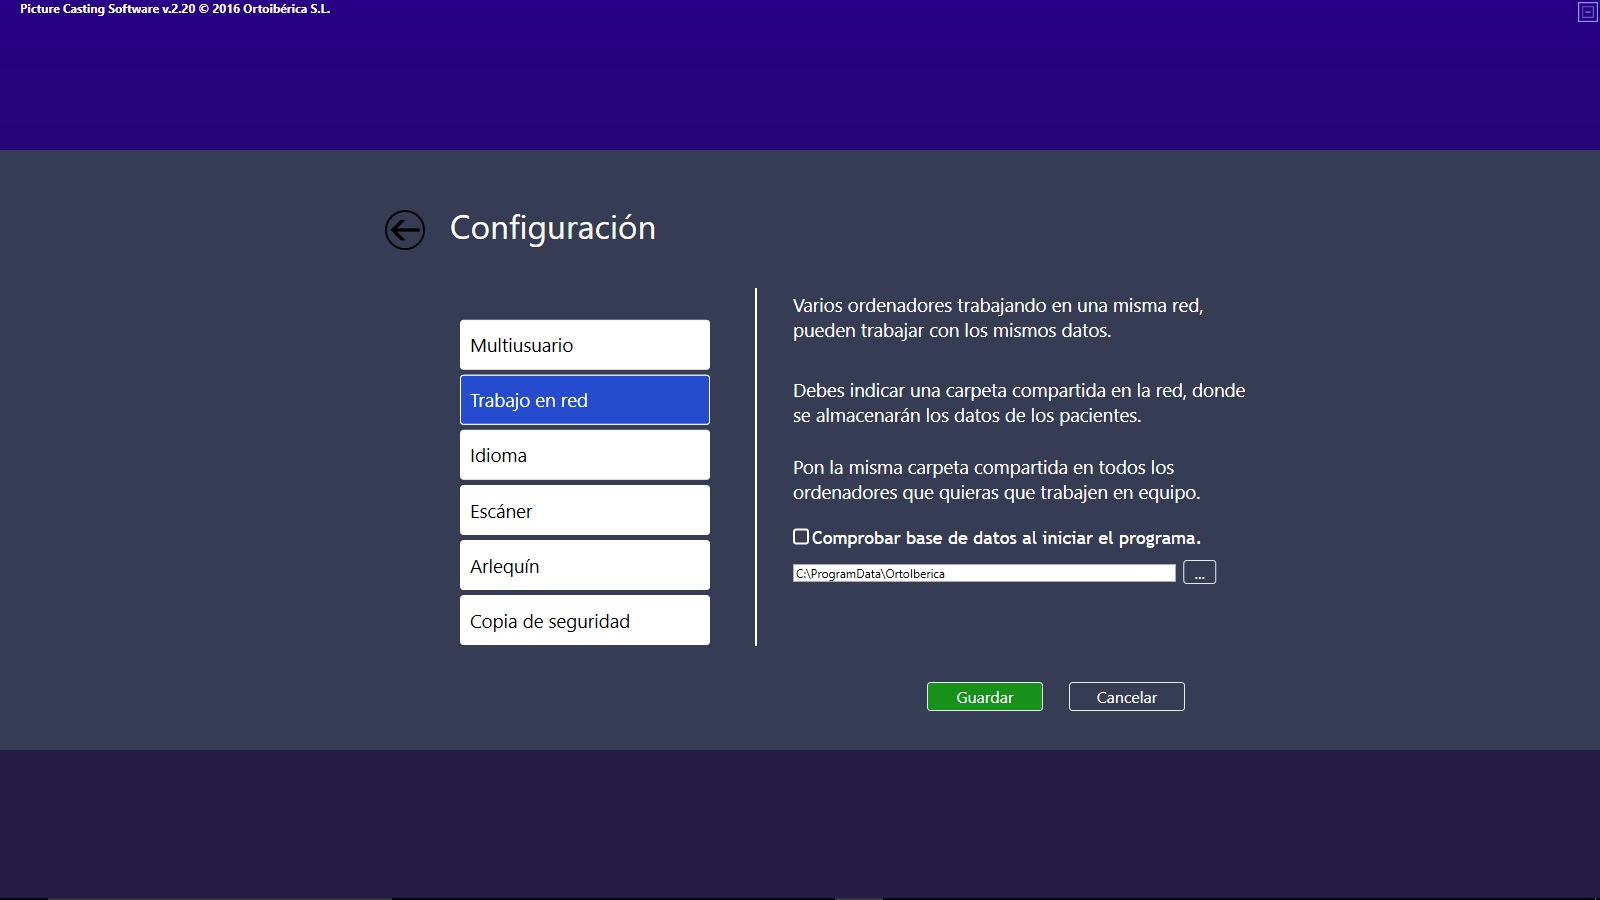
By default Pi.Cas.So. is installed in C:\ProgramData\Ortoiberica.
This routing can be varied by clicking on ![]()
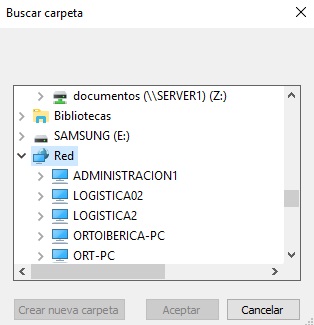
A search will open where we can choose the desired accommodation.
Once this operation is done we will have to perform the same steps on all computers that we want to be connected.
If there are computers in your organisation with different versions of Windows, it is important that you periodically check the “Program Compatibility”
![]()
Once activated and restarting the program, it will check and make compatible the databases.
NOTE: This check slows down the start of the program.
Security module.
This module allows only the user with his password to enter the software Pi.Cas.So., and in case we have activated the option Multiuser (see in this tutorial the multiuser option), each one of the users validated by the administrator can only access with their respective passwords. To do this follow the following steps:
Go to the Security module:
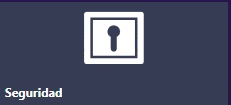
You will find a default user on the screen. It will be from the user who installed the software.
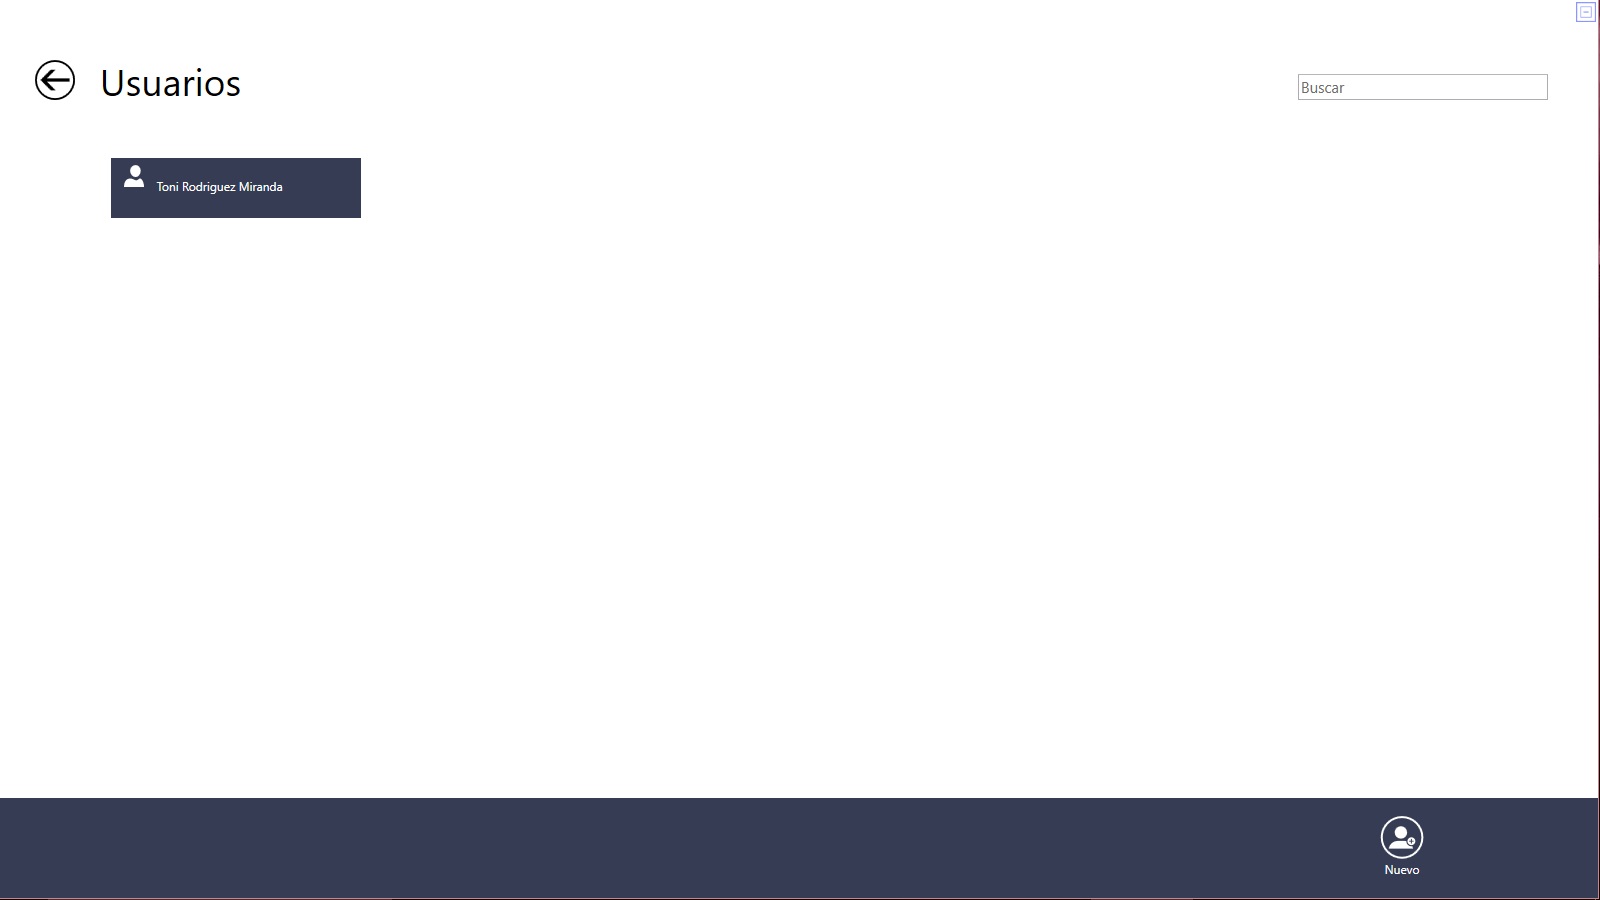
Clicking on the blue box which bears the name will be activated with a clear blue frame:

In addition to the lower base appear three options:

If we choose the option to Edit:

It will allow us to access the following dialogue:
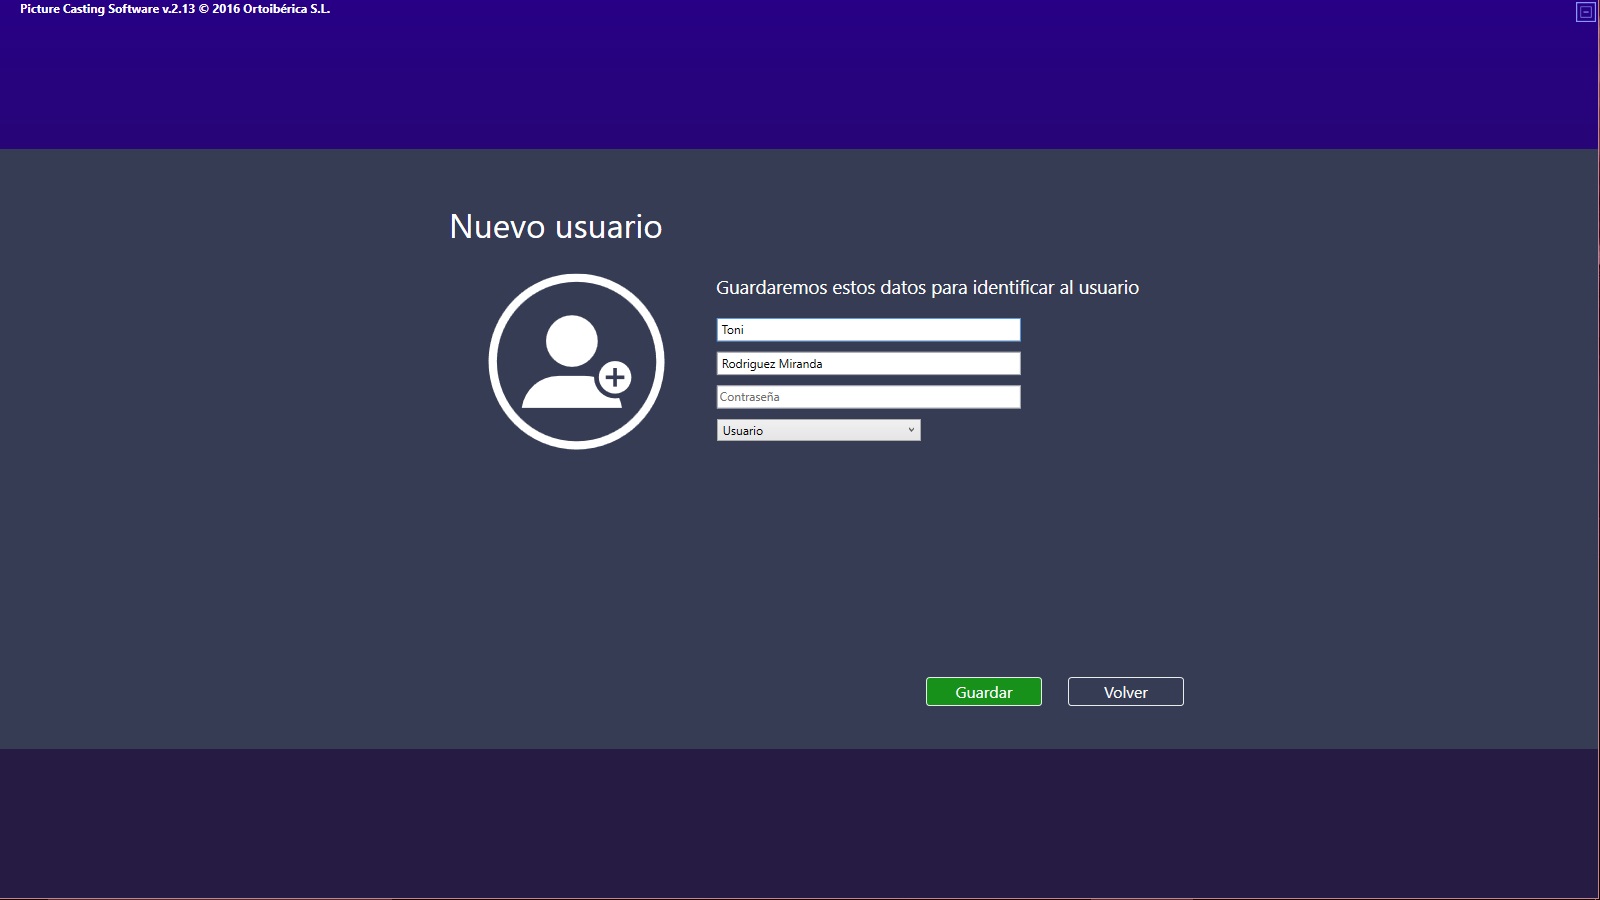
Edit will allow us to change or verify our name and enter a security password to access the software. We must also choose the option of administrator or user.
The administrator is the only user who can change the attributions of other users.
Users will only be able to access their patients, they will not be able to access or make changes in the patients of another user.
NOTE: Check that at least one user has administrator privileges.
After making the changes click on (save) ![]()
You can enter as many users as consider.

Click when you want to register a new user. The screen will be the same as in explaining the tutorial on the edit icon.
In addition to covering the fields, name and surname must grant the administrator or user. As well as choosing the password, it will be imperative to access the program.
NOTE: we remind you the importance of not forgetting the password, to prevent loss of data or files.

Click when you want to delete a user.
NOTE: Deleting a user will delete all associated files, photographs, work already done, etc.
Arlequín
It is a helpful app, allows us to take pictures of the patient, prescription or any other document and send them directly to the software Pi.Cas.So. to guide us and help us to achieve a better design.
For this, it is important that the photos are taken correctly and also that the smartphone or tablet is linked to the software Pi.Cas.So.
You can link as many smartphones or tablets as you want.
Apps can be downloaded to your smartphone or tablet from Google Play (Android) or App Store (IOS).
The application is free for Google Play, while in the App Store the price is 1.99€.
Linking smartphone or tablet to Pi.Cas.So
Whenever we install the software Pi.Cas.So. on a computer a different ID will be created, this will serve to link it to the peripherals, whether smartphones or tablets. This ID can be used on Android or Apple devices (IOS).
Remember that each installation will have a different ID. If you reinstall the software this code will change.
To view the ID we go to the module Configuration:

Activate the tab Arlequín.
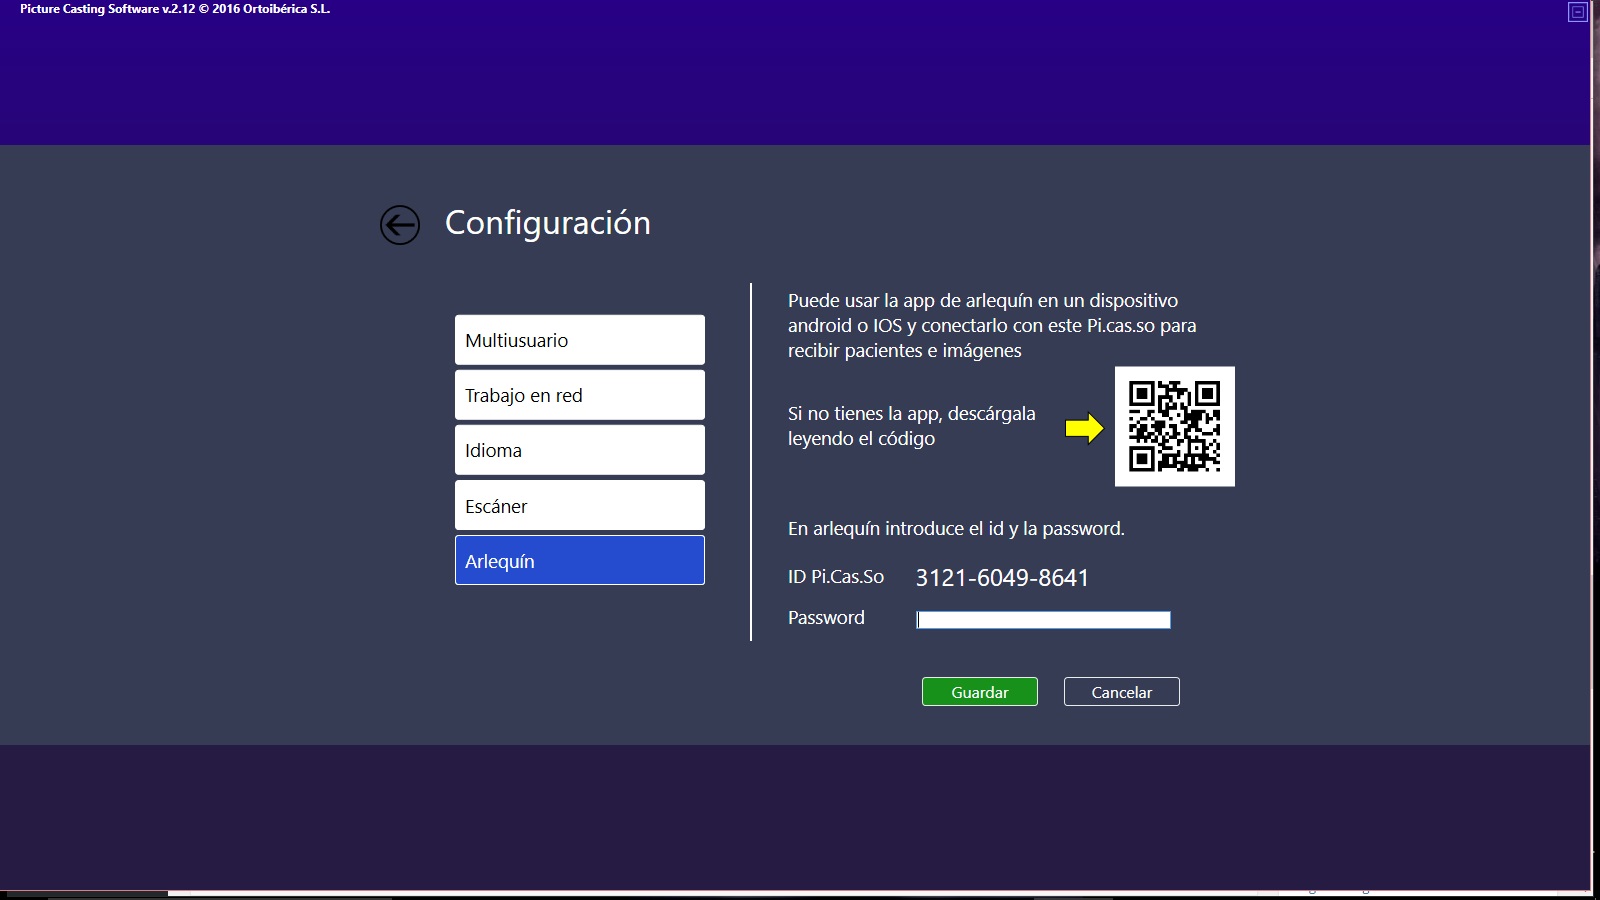
Here we can see a QR code, scanning with your smartphone or tablet, it will take you directly to Google Play or App Store and link for discharge. If you do not have the app to scan QR codes installed on your device, you can go directly to your icon Google Play or App Store and search Arlequín, download the application on your mobile or tablet.

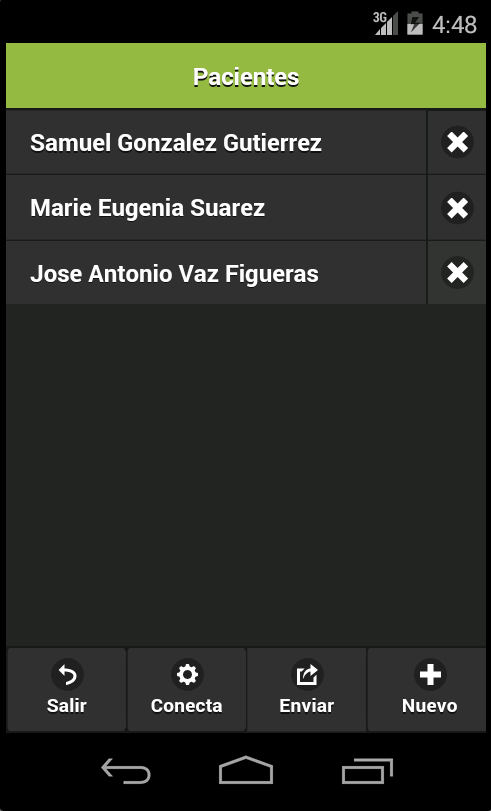
Already installed, the interface that appears will be the tab “Pacientes” (patients) and, at the bottom, have the following options:

We start by “Conecta” (connect), that will link the device to your computer where you have installed the Pi.Cas.So.
By accessing “Conecta” (connect) we see:
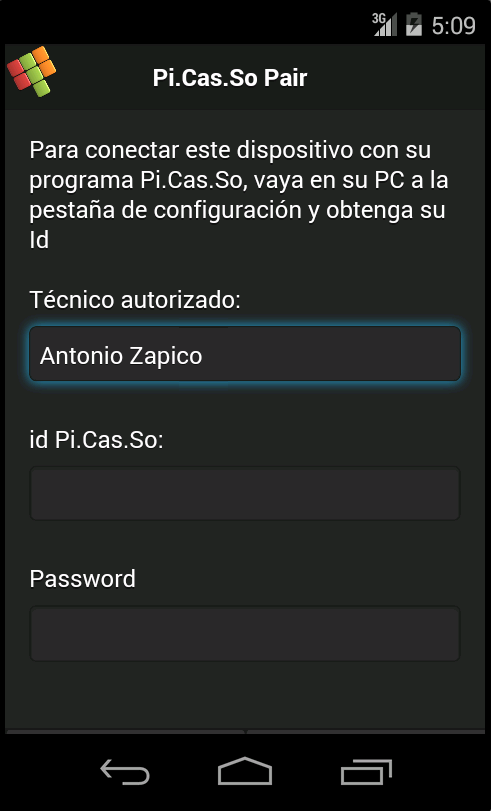
This tab called Pi.Cas.So. Pair, we must fill in the fields:
-“Técnico autorizado” (technical authorized): will the name of the technician who will make and send photos.
–id. Pi.Cas.So: we must enter the ID code that appears in Pi.Cas.So.
Note: respect the three sequences of four numbers including scripts.
–Password: enter the same password you previously entered in the software Pi.Cas.So.
Send photos from your smartphone
Enter Arlequín
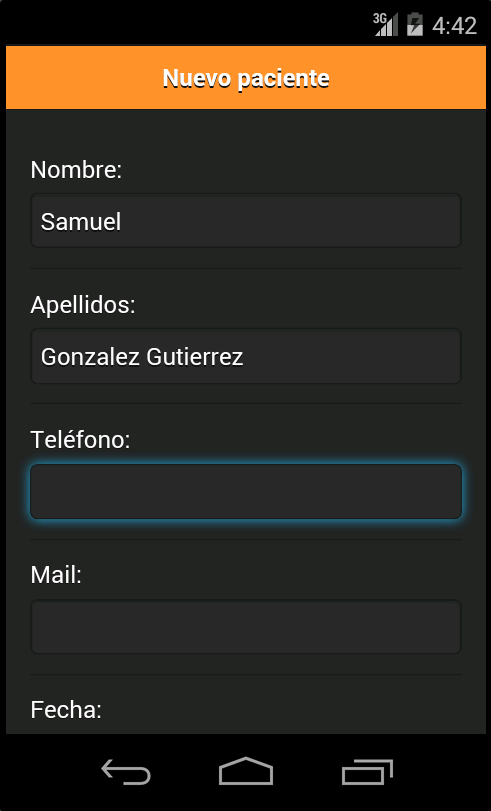
Create a new patient. Click on “Nuevo” (new) ![]()
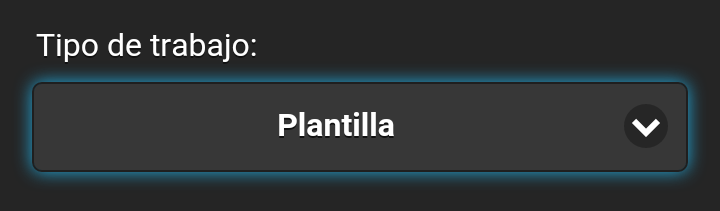
In “Tipo de trabajo” (type of work) choose the option.
Click on “Fotos” (photos) ![]()
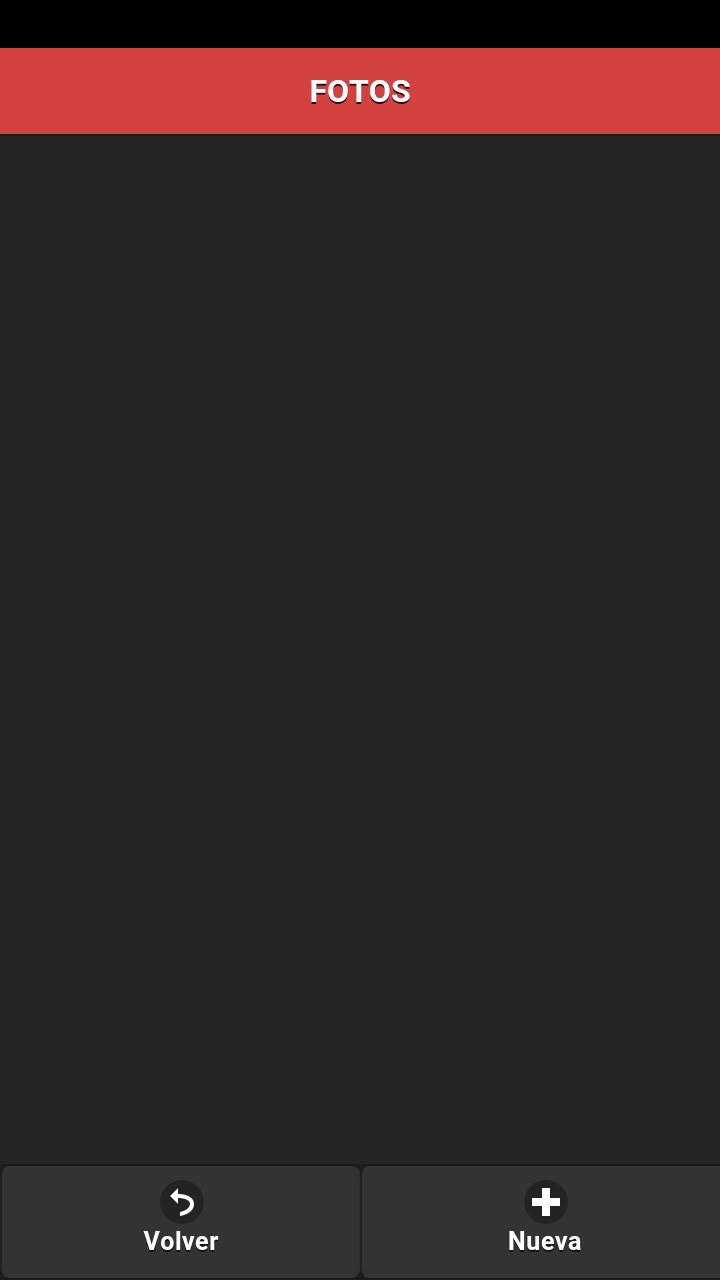
Click on “Nueva” (new) ![]()
Your camera opens.
Take the picture.
After done, you will see a thumbnail saved in the application interface.
You can make all the photos you want, they will be linked to the same patient.
To delete a photo must clicking on the blade on the left side ![]()
When you finish taking the photos, click on “Volver” (return) ![]()
Return to the patient data.
Click on “Guardar” (save) ![]()
You can select the patients you want to send, Arlequin will send them with their linked pictures.
Click on “Enviar” (send) ![]()
If you want to delete the patient with all data unsent, click on ![]()
NOTA: there may be small changes or differences between smartphones Android and IOS.
Receive photos.
Go to the module “Arlequín”.

Within this module appears a relation of the photos received in our ID of Pi.Cas.So.
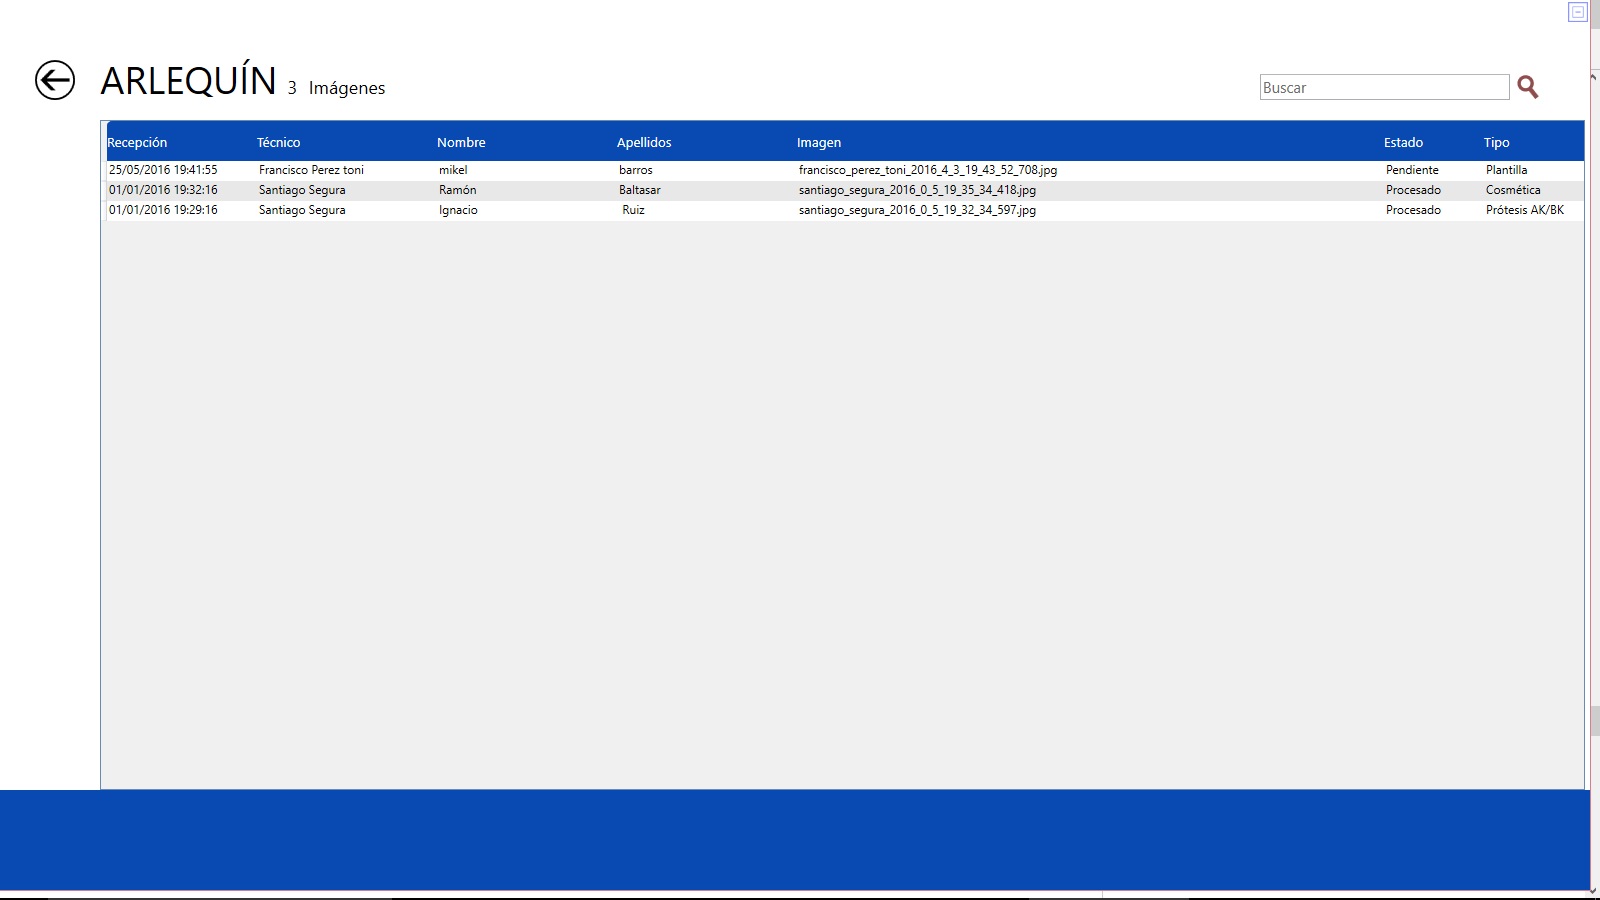
In this module, we will be able to observe the date, time of sending, name and surname of the patient, name of the photograph file and the type of work. There is also information about the state of the photograph: processed or pending.
Processing refers to photography and the information has already been linked to the patient and this information with your files already in the patient database.
Pending is still the picture is the input module.

If we are to “Entradas” (entries) you can assign pictures to a new patient or a patient already in our database.

Make a backup.
In the Configuration tab, you will have the option to make a backup.

First, it is essential to have WinZip installed on your computer to make backup copies of Pi.Cas.So.
In the graph, we have noted with the letter A the information that Pi.Cas.So provides us with the number and type of files you have in the application in every moment. It is no information to back up that we have made. This is information relating to the actual time of application.
Marked with the letter B we can see where the ZIP folder will be saved with the copy of all the files that are currently in the application Pi.Cas.So.
To change or choose a specific routeing, we must click on ![]()
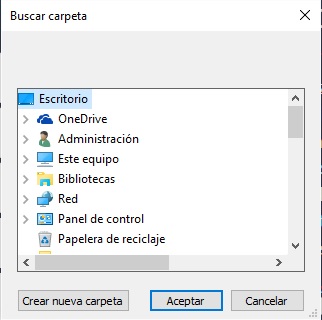
We can host it on the PC, or on an external drive (pen drive).
Once the “routeing” is configured where we want the backup to be done, we must click on icon![]() We will see on the screen a verification that the copy is being made:
We will see on the screen a verification that the copy is being made:
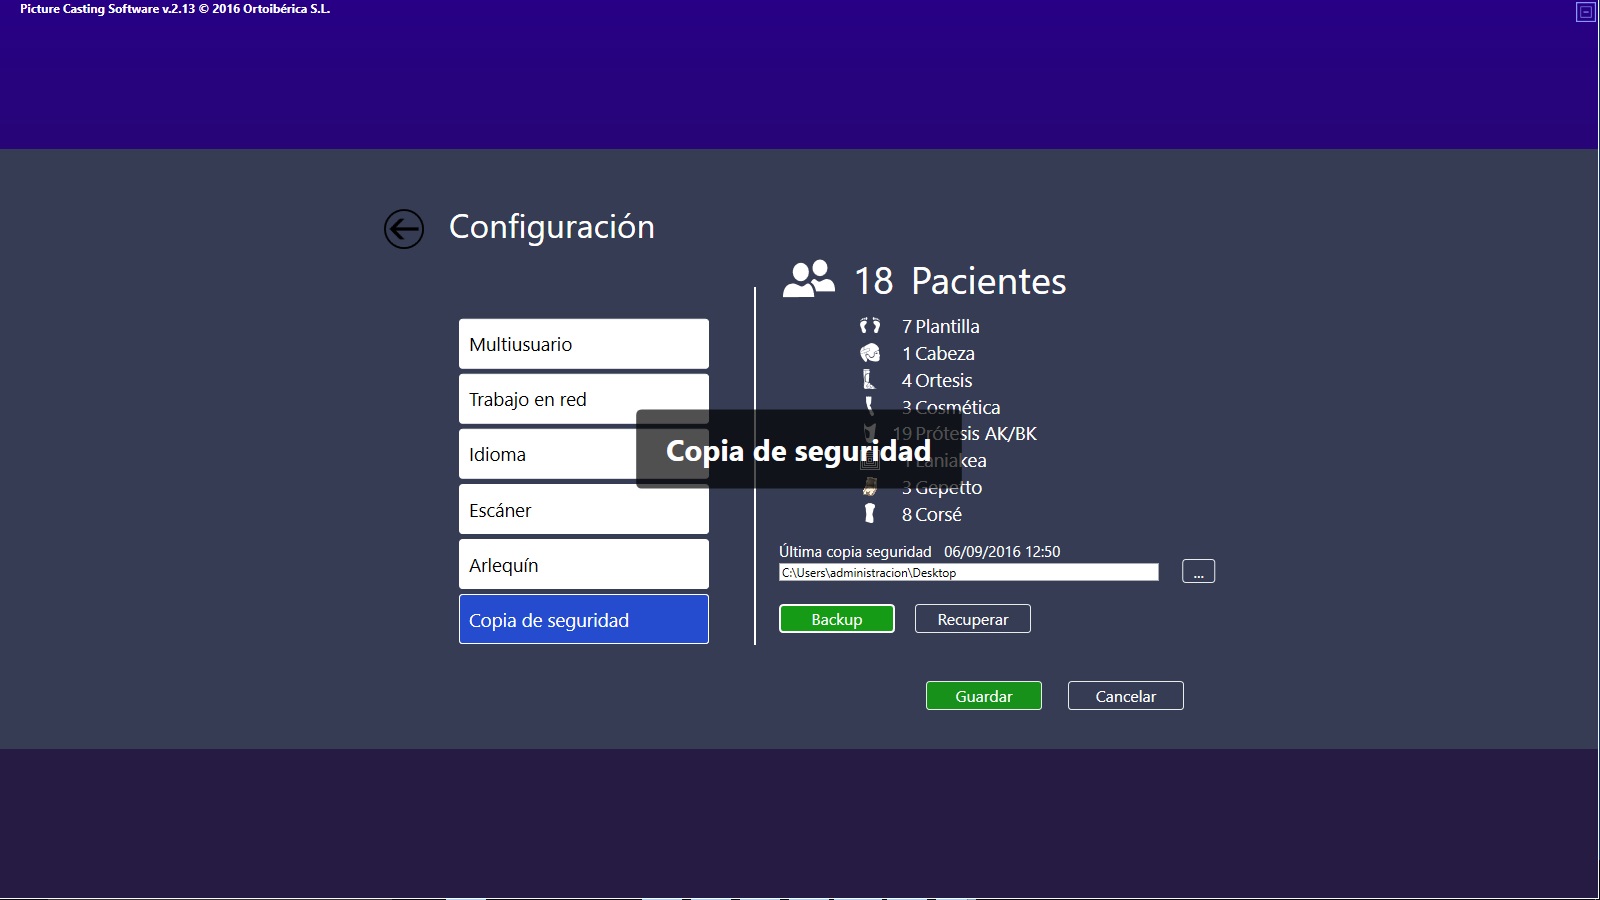
Made the backup, we can see the direction of routeing the date and time of the last made:
![]()
Retrieve a backup
A ZIP file from a backup has the following extension![]() . It shows the date and time at which the copy was made.
. It shows the date and time at which the copy was made.
To retrieve the copy, we must click on ![]() It will take us to the copy or copies where we have hosted the “backup”.
It will take us to the copy or copies where we have hosted the “backup”.
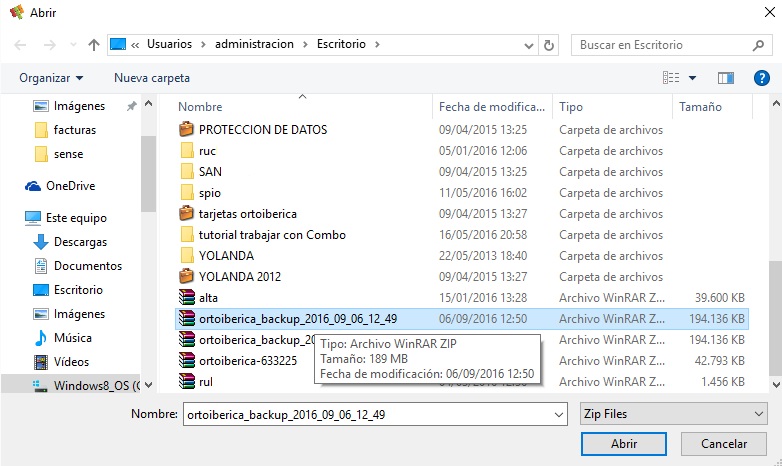
We will choose the copy we want to recover.
NOTE: remember that the last copy is indicated at the top of the routeing indicator.
It displayed a warning:
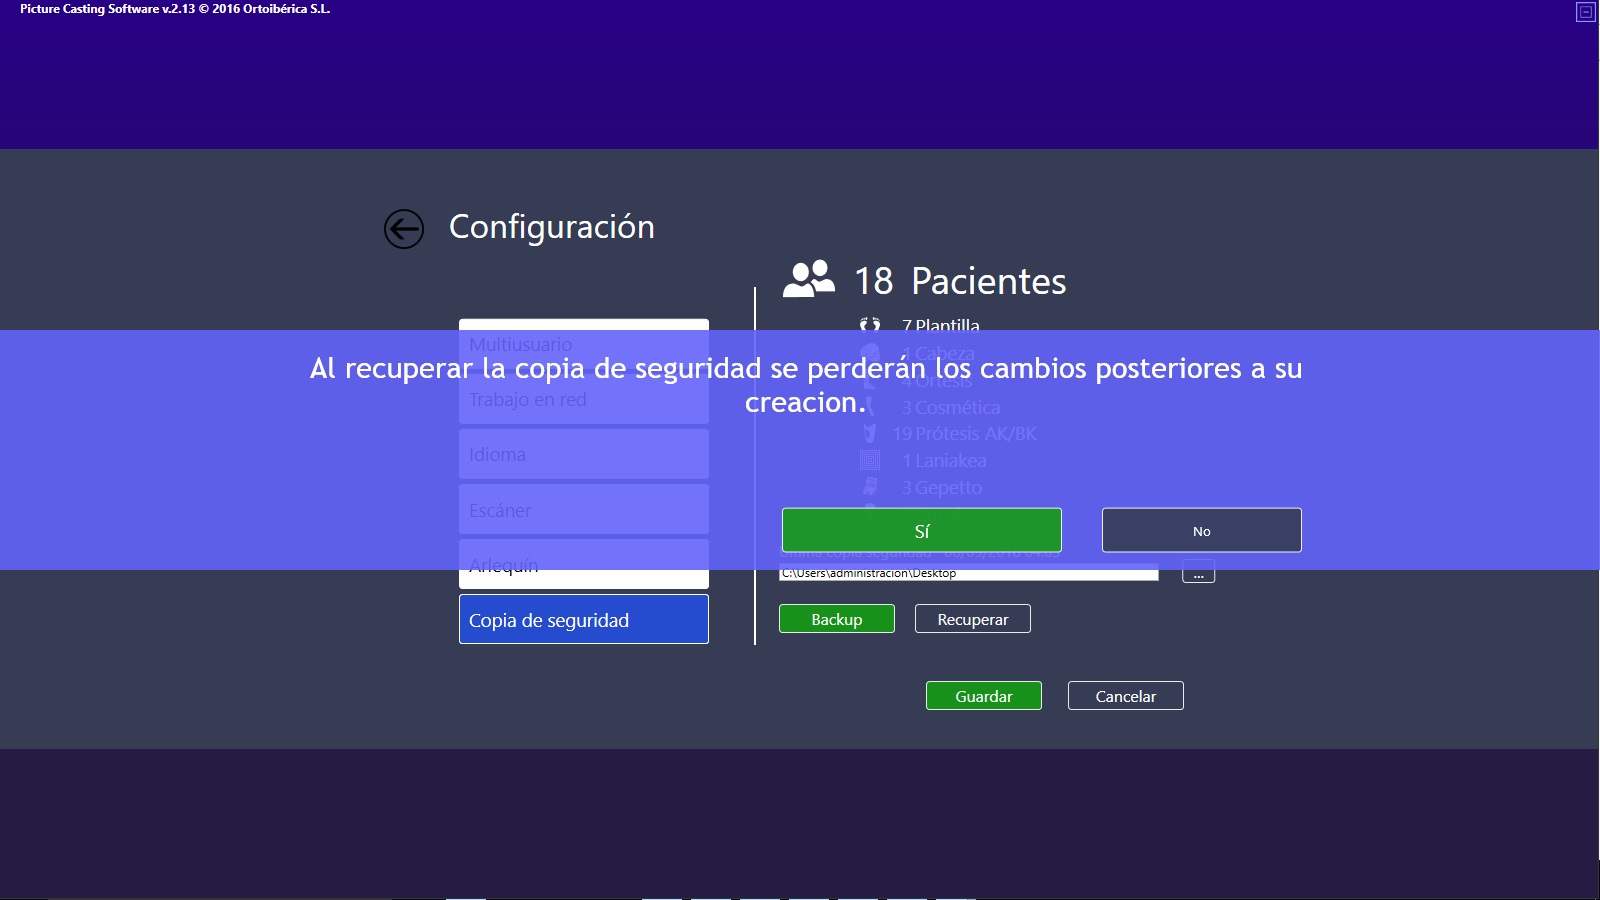
An alert message will appear on the screen, if we want to recover the backup, we will lose the data that we have obtained after that copy.
If we confirm that we want to do the backup, a file explorer will appear where the backups are hosted. We will be able to choose the one that we want to recover.
We click “Aceptar” (confirm) and have already recovered the copy in our program.
Register.
It is identified with the following icon.
Although this process is not obligatory, registration has some advantages, such as:
- You will receive updates immediately.
- You can have an assistance service sending all your doubts or suggestions to the email address: welcome@ortoiberica.es
- You can include your anagram in the initial interface.
To register you must complete all the fields of the registration request.
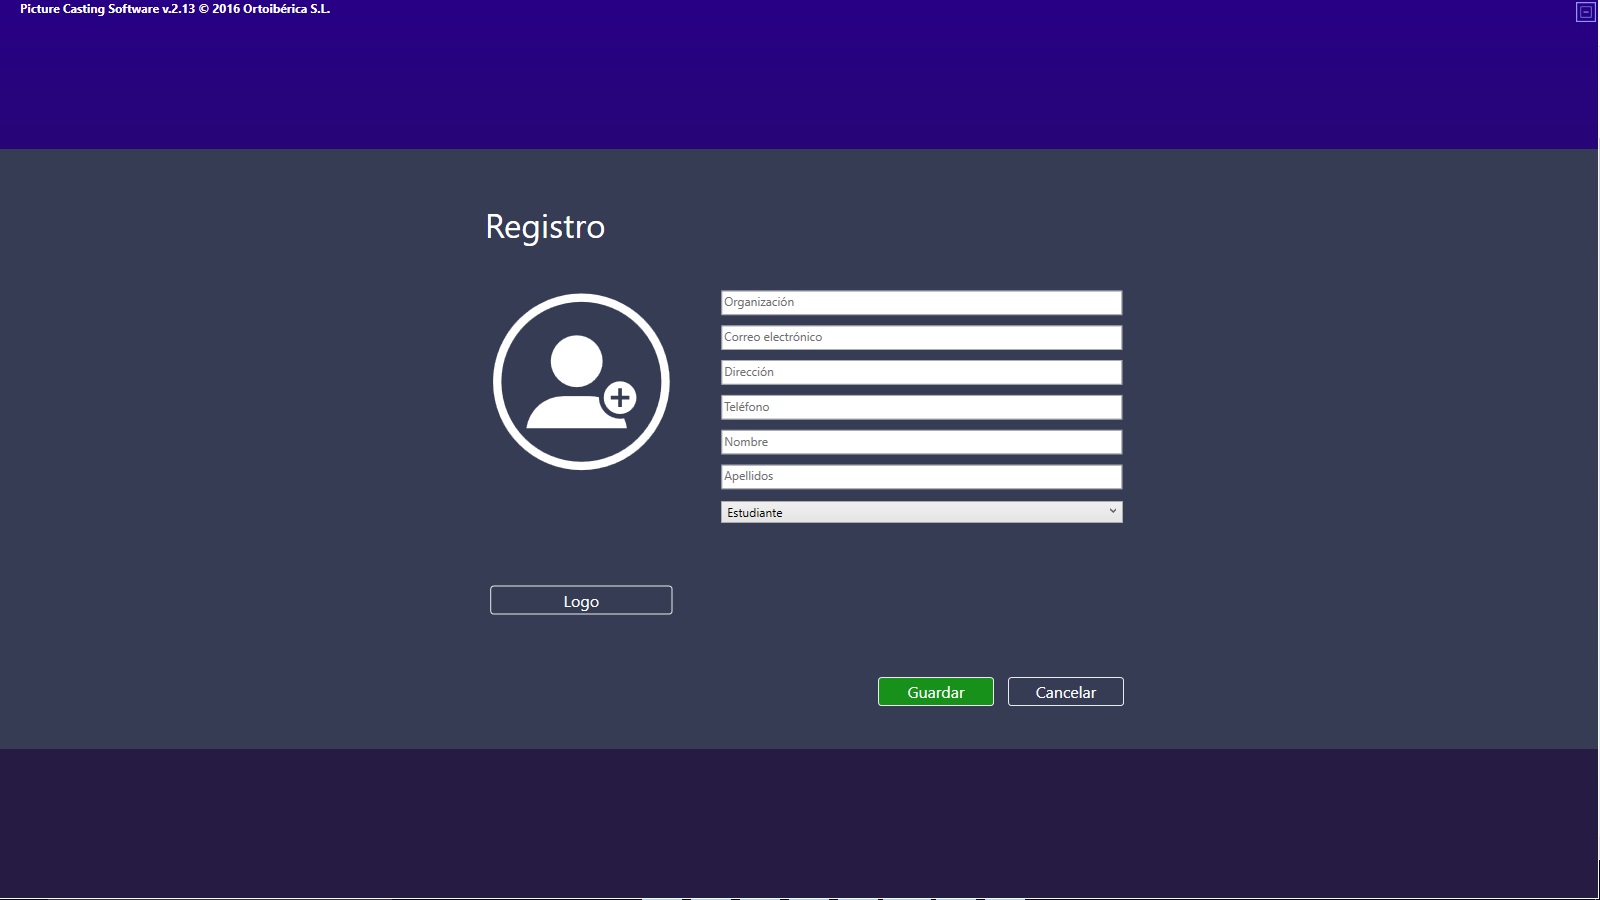
After completing all the fields. Click on ![]()
To enter your logo in the initial interface you must click on ![]()
The following file explorer will open:
Concepts.
- Basic notions of CAD CAM.
- How to maximize the software.
- Files.
Interface.
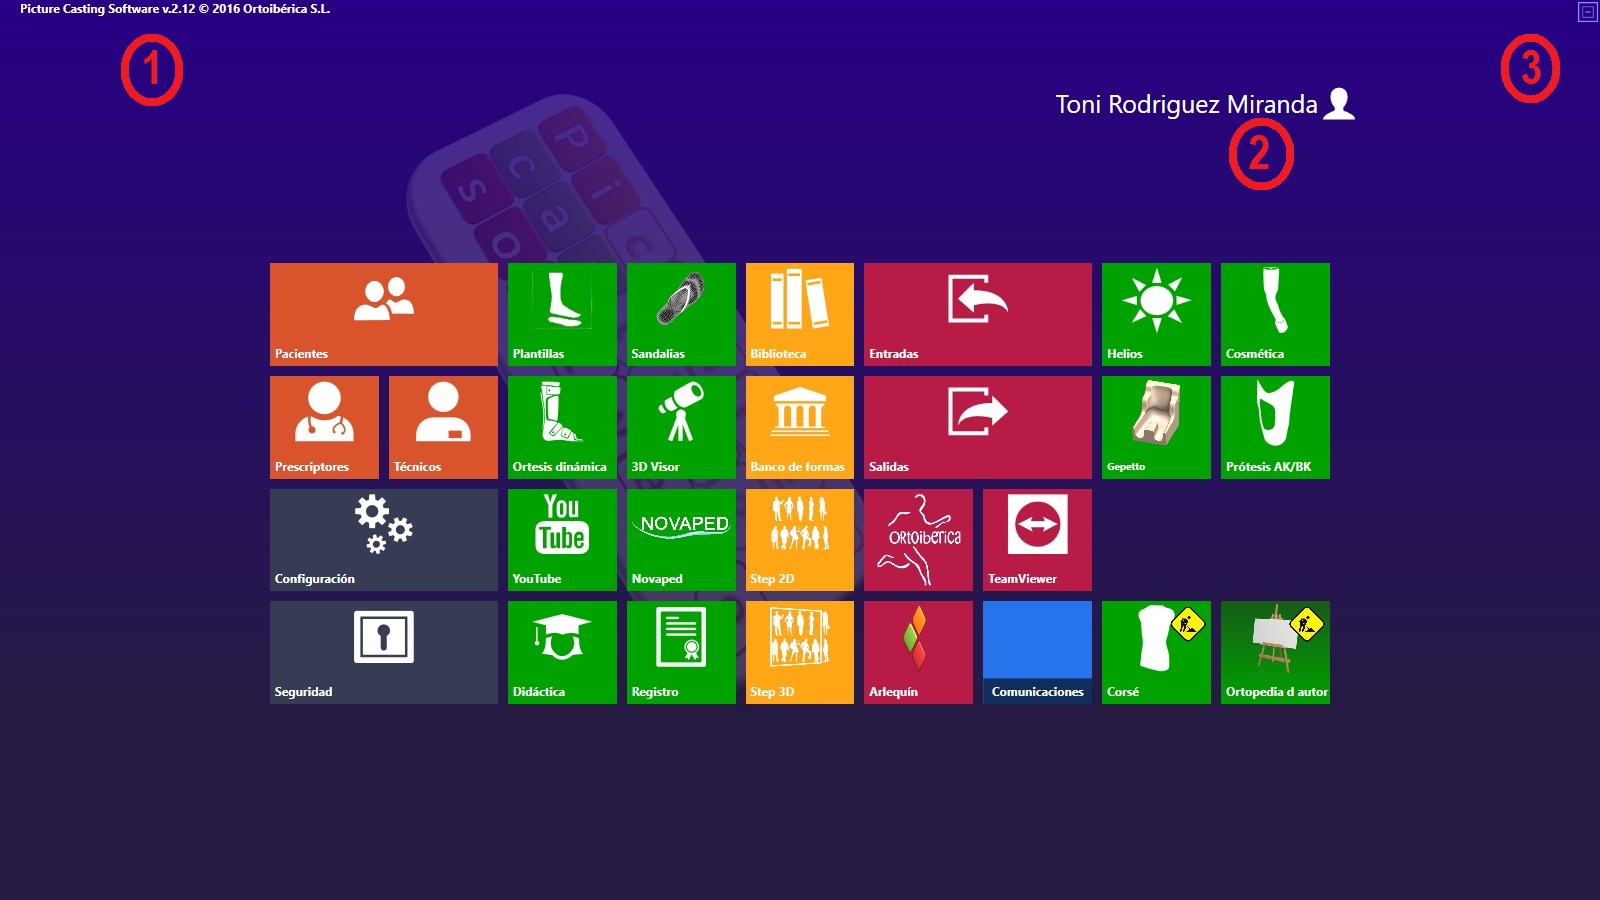
Installed version.
In the image above and with the number one, we can see the version of the software that we have installed.
Note: it is important, when you make any queries about the software, to refer to the version you have installed.
Exit the program.
With the number two in the image, the name of the software user appears. If we click on it, the exit tab will appear that allows us to make an orderly output of the same.
Minimize.
With the number three we have marked the minimize icon which allows us, clicking on it, perform another task with the computer, although we have the software open.
Modular system.
One of the features of Pi.Cas.So. is its “modular” design. The advantage is the individual adaptation for each type of product. For example, to make a template, the milling machine would be a “vertical attack” machine or an additive printer, but for the realisation of a corset or prosthesis, we would need a circular milling machine or a robot. For a seat or for a KAFO, we would need a milling that could do it in at least two planes, for example, a robot. The scenarios are therefore different and the problem of design in each case also varies.
Al ser modular, cada vez que entramos en un módulo, contempla ya la problemática expuesta y por tanto con el mismo software podremos dar solución integral. Si no fuera así, deberíamos utilizar un software diferente para cada uno de los escenarios. Un software solamente para hacer plantillas, otro software para hacer formas circulares como corsés o prótesis, y otro software para asientos.
As it is modular, every time we enter a module, already contemplates the problem exposed and therefore with the same software we can give an integral solution. If not, we should use different software for each of the scenarios. A software only for making templates, other software for making circular shapes such as corsets or prostheses, and other software for seats.
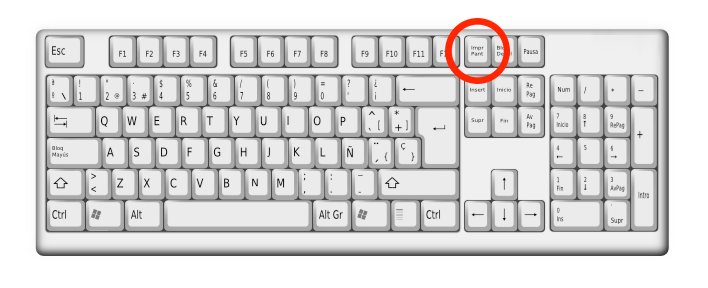
Screen printing.
There is no specific tool for screen printing in the software. We can do at any time a screenshot since all computers contemplate this possibility. On your keyboard, at the top or bottom, you will see a key that allows it.
We advise opening a basic image application such as “Paint” ![]() Once opened we can minimise it (click minimise in the upper left of the paint interface). The paint program will remain open in the taskbar.
Once opened we can minimise it (click minimise in the upper left of the paint interface). The paint program will remain open in the taskbar.
Back to Pi.Cas.So. To the work, we are doing and we want to print.
Press the “print screen” key and maximise paint.
Click on Paste ![]() and we can see the captured image. We can save as jpg or the extension that we consider.
and we can see the captured image. We can save as jpg or the extension that we consider.
If we make a report and want to confirm the patient’s name we must follow the steps indicated below.
See file name in use.
To see the patient’s name on the screen print, we must press the “I” button on our keyboard. The name of the patient will appear, we will also see the date and time the work was performed.
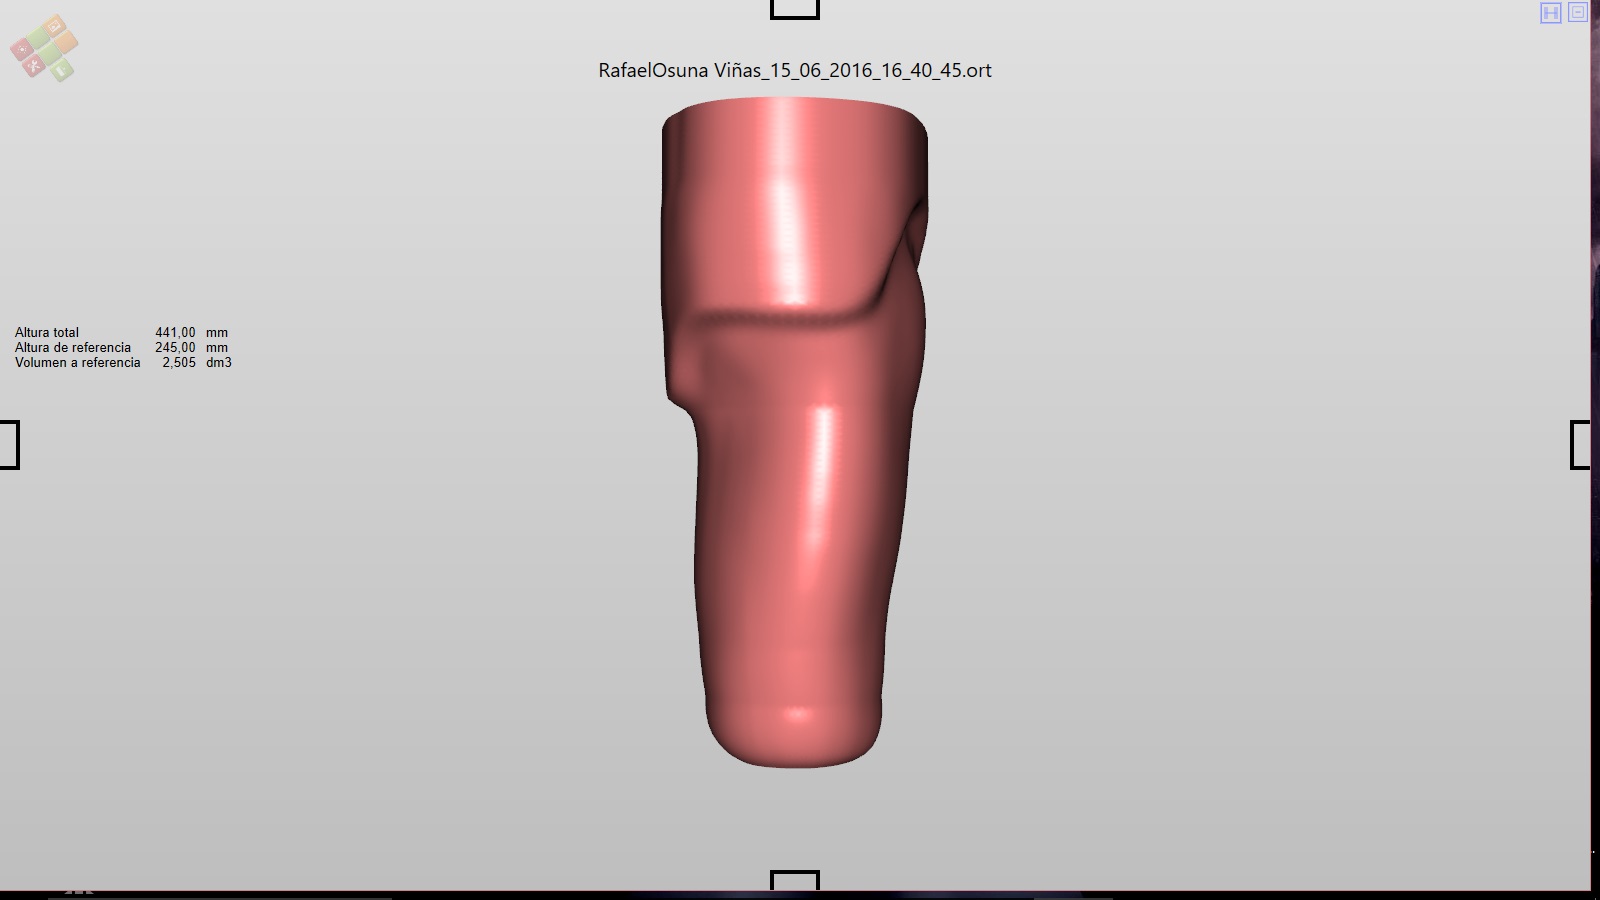
To make it disappear press the “I” key again
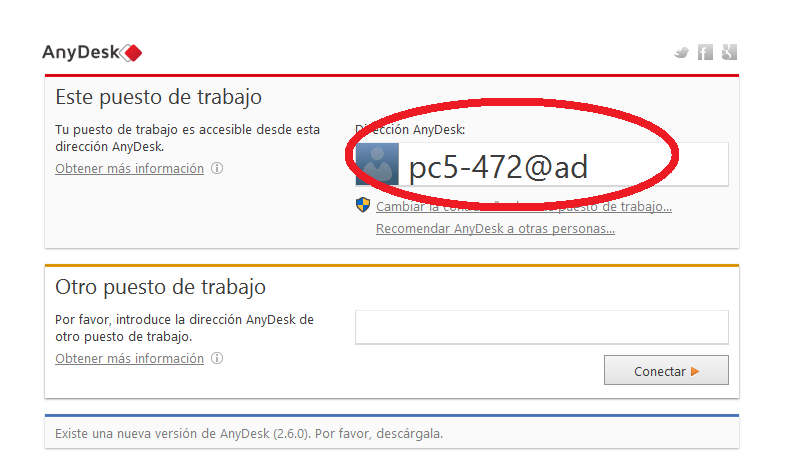
Remote control assistance
In case of assistance by remote control, please have downloaded the following program: AnyDesk
For download, you only have to go to the following link: http://anydesk.com/download
It will download an executable that you will have to install on your computer.
The following icon will appear on the desktop, which you must ” click” to begin the session: ![]()
For the connection you must provide us the sequence of numbers and letters that appear in AnyDesk (please respect capital letters, and signs):